

Setting up a RedM server might seem daunting at first, but with this step-by-step guide, you’ll have your server up and running in no time. Follow these instructions carefully: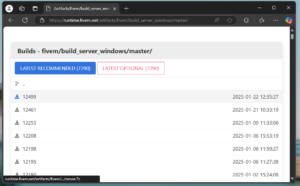

Step 1: Download the Latest Server Version
- Visit the official RedM website and navigate to the Server Artifacts section.
- Download the latest version of the RedM server files to your computer.
Step 2: Create a Folder for Your Server Files
- Choose a location on your computer where you want to host your server files (e.g., Desktop or C:\Servers).
- Create a new folder and name it something recognizable, such as “MyRedMServer.”
Step 3: Extract the Server Files
- Open the downloaded RedM server files using a tool like WinRAR or 7-Zip.
- Extract all the files into the folder you created earlier.

Step 4: Launch the Server
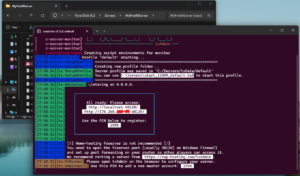
- Inside the folder, locate and double-click on FxServer.exe to start the server.
- Wait for the server to initialize. This may take a few moments.
Step 5: Follow the Web Link
- Once the server starts, it will display a web link in the console. This link directs you to the server management tool, TxAdmin.
- If the link doesn’t open automatically in your browser, look for it in the FxServer console. It should resemble something like http://localhost:40120.
- Copy and paste the link into your web browser if needed.
- Link Your Cfx.re account.
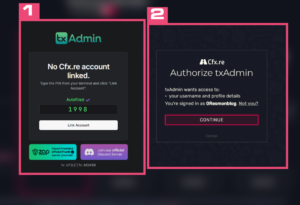

Step 6: Log In to TxAdmin
- On the web page that opens, log in using your Cfx.re account credentials.
- Once logged in, you’ll be directed to the TxAdmin dashboard, where you can manage your server.
Step 7: Deploy a Pre-Made Server Framework
- In the dashboard, select the option to deploy a pre-configured server framework.
- Follow the prompts to choose a ready-to-use server setup that fits your needs.
- TxAdmin will guide you through the process of downloading and setting up the framework.


Additional Help
If you’re unsure about how to deploy a server framework, check out our detailed article on “How to Deploy Server Frameworks in RedM.” This guide provides in-depth instructions to ensure a smooth deployment process.
By following these steps, you’ll have your RedM server up and running quickly, ready to customize and share with your community!